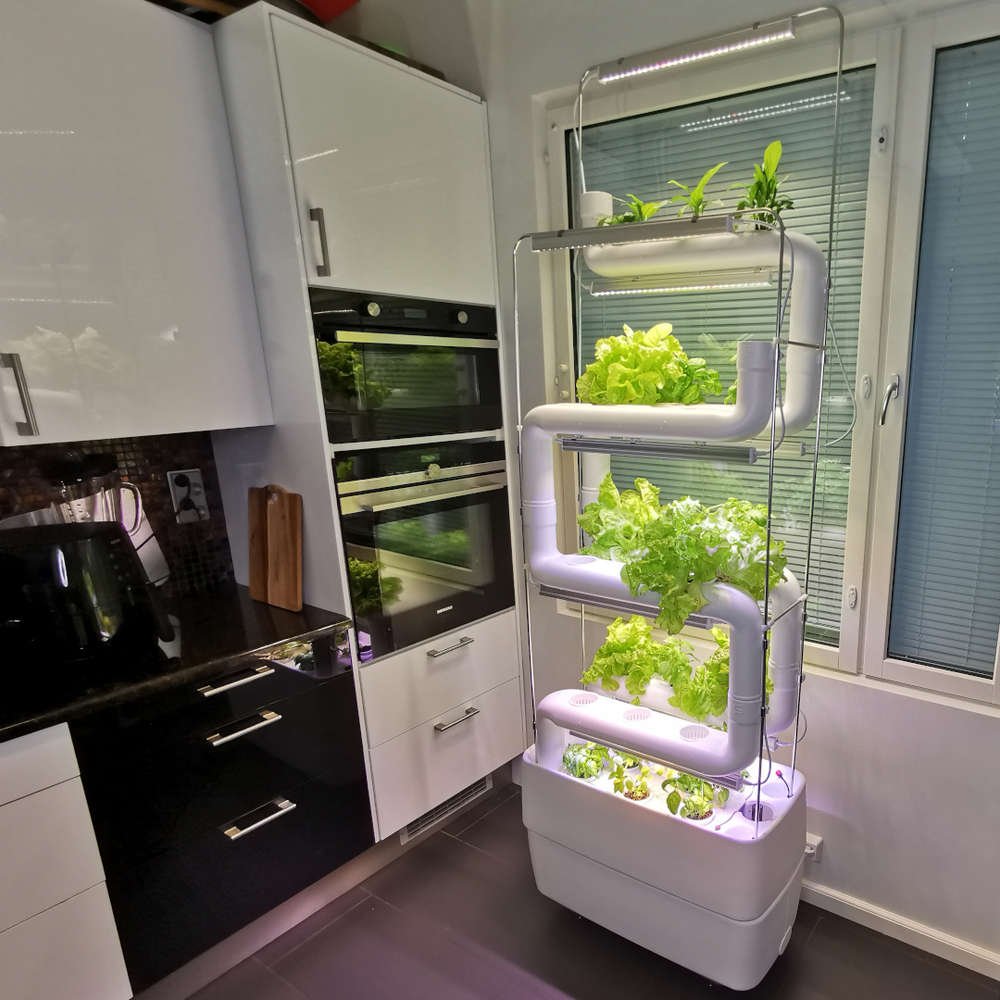
How to Start a Hydroponic Garden in Your Kitchen
Forget the dirt. Seriously. If you’ve ever dreamed of fresh greens, ripe tomatoes, or spicy peppers year-round, but your thumb is decidedly not green, I’ve got your back. We’re talking about hydroponic gardening, and doing it right there in your kitchen. No soil, no mess, just pure, unadulterated plant-growing magic. It sounds fancy, maybe even a little intimidating, but trust me, it’s totally doable. Think less farm, more futuristic science project you can actually eat. And the best part? You can crank this thing out in a weekend, even if your DIY skills are, shall we say, ‘developing’. Ready to ditch the grocery store produce aisle? Let’s dive in.

Source : tchorticulture.com
Why Bother With Hydroponics? It’s Not Just for Nerds.
Okay, so why all the fuss about growing plants without soil? Simple: faster growth and often, bigger yields. Because the roots get direct access to all the nutrients they need, plants just blast off. We’re talking weeks, not months, for some crops. Plus, it’s way more efficient with water. Like, ridiculously so. You’ll use up to 90% less water than traditional soil gardening. Big win for your wallet and the planet, right? And for those of us stuck in apartments or with zero outdoor space? This is your golden ticket. Your kitchen counter becomes your personal farm-to-table operation. Imagine snipping fresh basil for your pasta, right when you need it. That’s the dream, and hydroponics makes it happen.
The Core Concept: What IS Hydroponics, Really?
At its heart, hydroponics is just growing plants using nutrient-rich water instead of soil. Soil usually acts as a delivery system for water and nutrients. Hydroponics cuts out the middleman. You mix a special blend of hydroponic nutrients into water, and that’s what feeds your plants. The roots either sit directly in this nutrient solution, or are periodically flushed with it. It’s clean. It’s controlled. And it’s surprisingly simple once you get the hang of it. You’re basically giving your plants a spa treatment, but with minerals instead of cucumber slices.
Choosing Your Hydroponic Weapon: Systems Explained
Alright, so not all hydroponic systems are created equal. You’ve got a few main players, each with its own vibe. For a kitchen setup, we’re usually looking at the smaller, more manageable ones.
Deep Water Culture (DWC): The Lazy Gardener’s Dream
This is probably the simplest setup to wrap your head around, especially for begiers. Basically, your plant roots hang suspended in a reservoir of nutrient-rich, oxygenated water. An air pump with an airstone bubbles oxygen into the water, keeping the roots happy and preventing them from, you know, drowning. It’s super low-maintenance once it’s set up. Just fill it, plug it in, and let it ride. This is a fantastic way to start if you want something reliable and easy. You can check out various hydroponic growing systems to get an idea.
Nutrient Film Technique (NFT): The Professional’s Choice (But Still Doable!)

Source : coffeewithus3.com
NFT is a bit more sophisticated. It involves a constant, shallow stream of nutrient solution flowing over the bare roots of plants held in chaels or gullies. The water circulates from a reservoir, through the chaels, and back again. It’s super efficient but requires a bit more precision with your pump and chael angles. Think of it like a gentle, nutrient-infused river for your roots. It’s efficient and can yield some impressive results, but DWC is usually the go-to for a first-time kitchen garden.
Drip Systems: The Old Reliable (with a Twist)
Drip systems are common in larger setups, but you can scale them down. A timer controls a pump that periodically drips nutrient solution onto the base of each plant. Excess solution drains back into the reservoir. It’s flexible and you can customize it a lot, but it involves more tubing and potentially more points of failure. For a small kitchen space, it might be overkill unless you’re feeling particularly ambitious.
Wick Systems: The Simplest (Maybe Too Simple?)
This is the most basic, passive system. A wick (like a felt strip or rope) draws nutrient solution up from a reservoir into the growing medium around the plant roots. No pumps, no electricity. Super simple, super cheap. The catch? They’re often not great for larger or thirstier plants. They work best for smaller herbs and greens where water demand isn’t super high. It’s the set-it-and-forget-it option, but sometimes forget-it means the plant forgets to thrive.
Kitchen Hydroponics: What You Actually Need
Okay, let’s get down to brass tacks. You want to grow stuff in your kitchen. What’s the bare minimum you’ll need to buy?
The Reservoir: Your Plant’s Bathtub
This is where the magic happens – the nutrient solution lives here. You can use anything from a sturdy plastic storage tote (opaque is best to prevent algae growth!) to a purpose-built hydroponic reservoir. Make sure it’s food-grade plastic and large enough to hold enough water for your system without needing constant refills. For a small kitchen setup, a 5-10 gallon container is usually plenty. Cleanliness is key here; you don’t want funky stuff growing in there.
Growing Medium: Not Soil, But Something!
Since we’re ditching dirt, we need something to support the plant’s roots and anchor them. Popular choices include:
- Rockwool: These little cubes are like sterile sponges. You soak them, plant your seedling, and pop them into your system. They hold moisture really well.
- Coco Coir: Made from coconut husks, this stuff is sustainable and has great aeration. It’s similar to peat moss but better for the environment.
- Perlite/Vermiculite: These are volcanic rocks that are super lightweight and provide excellent drainage and aeration. Often used in mixes.
- Clay Pebbles (Hydroton): These are lightweight, pH-neutral balls that offer great support and airflow. They’re reusable, too! Just rinse them well.
For a begier kitchen setup, especially with DWC, rockwool cubes or coco coir plugs are often the easiest starting points.
Nutrients: The Plant Food You Can’t Get at Grocery Stores
This is non-negotiable. You can’t just use regular fertilizer. Hydroponic nutrients are specifically formulated to provide all the macro- and micronutrients plants need when there’s no soil. They usually come in a two or three-part liquid or powder form. You’ll mix them with water according to the manufacturer’s instructions. Don’t eyeball it; getting the mix right is crucial. Too much or too little, and your plants will definitely let you know (usually by dying).
Lighting: Your Kitchen Might Not Cut It
Unless you have a sun-drenched south-facing window that’s literally always bright, you’ll probably need grow lights. Standard kitchen lighting just won’t cut it for most plants. You’ll want full-spectrum LED grow lights. They’re energy-efficient, don’t produce a ton of heat (important in a kitchen!), and provide the right wavelengths for plant growth. You can get simple clip-on lights or larger panel lights depending on your setup size. This is often the most expensive part, but crucial for success.

Source : joybileefarm.com
Air Pump & Airstone (for DWC): Gotta Breathe!
If you go with a DWC system, you absolutely need an air pump and an airstone. The pump pushes air through the airline tubing to the airstone, which sits in the nutrient solution and creates tiny bubbles. These bubbles add vital oxygen to the water, preventing root rot and keeping your plants alive and thriving. Don’t skimp on this; a decent aquarium air pump is usually sufficient for a small setup.
pH Meter & EC/TDS Meter: The Techy Bits
Okay, a little more tech, but honestly, essential for consistent results. A pH meter measures the acidity or alkalinity of your nutrient solution. Most plants prefer a pH between 5.5 and 6.5. Too high or too low, and they can’t absorb the nutrients. An EC (Electrical Conductivity) or TDS (Total Dissolved Solids) meter measures the concentration of nutrients in your water. This helps you ensure you’re not over or underfeeding. They seem complicated, but you can find affordable digital meters online. Honestly, they’re worth the investment for serious growers.
Getting Started: Your First Kitchen Hydro Garden, Step-by-Step
Ready to get your hands dirty… well, wet? Let’s build a simple DWC system. It’s the easiest entry point.
Step 1: Gather Your Gear
You’ll need: An opaque storage tote (5-10 gallons), a lid for the tote, net pots (sized to fit holes you’ll cut), your chosen growing medium (rockwool cubes or coco plugs are great), hydroponic nutrient solution, an air pump, airline tubing, an airstone, a drill with a hole saw bit (sized for your net pots), seeds or seedlings, pH up/down solutions, and a pH meter. Oh, and a good pair of scissors or a utility knife for trimming things.
Step 2: Prepare the Reservoir and Lid
Clean your tote thoroughly. Then, using your drill and hole saw, cut holes in the lid spaced appropriately for the plants you want to grow. Don’t overcrowd! Leave enough room for them to spread out. Place your net pots in the holes to check the fit. They should sit snugly.
Step 3: Set Up the Aeration
Drill a small hole near the top edge of the tote (or in the lid) just big enough for your airline tubing to pass through. Coect the airline tubing to your air pump and the airstone. Place the airstone in the bottom of the tote. Run the tubing out through the hole you drilled. Place the air pump outside the tote and ideally higher than the water level to prevent back-siphoning if the power goes out.
Step 4: Mix Your Nutrients
Fill your tote with fresh, filtered water (tap water is okay for many plants, but more on that later). Follow the instructions on your nutrient bottles exactly. Add Part A, stir well. Then add Part B (and C, if you have it), stir well. Never mix concentrated nutrients directly together; it can cause nutrient lockout. Use your EC/TDS meter to check the nutrient level. For most greens, aim for a reading between 800-1200 ppm (parts per million).
Step 5: Adjust the pH
Now, test the pH of your solution with your pH meter. If it’s too high (above 6.5), add a tiny bit of pH Down solution and stir. Test again. Repeat until you hit your target range (5.5-6.5). If it’s too low (below 5.5), use pH Up. Be patient; a little goes a long way. You’ll need to monitor and adjust this daily or every few days, especially at first.
Step 6: Plant Your Seeds or Seedlings
If starting from seed, you’ll typically germinate them in rockwool cubes or coco plugs first. Once they have their first true leaves and a bit of root showing, you can place these plugs directly into your net pots. If using seedlings started elsewhere, gently rinse all the soil off their roots. You don’t want any dirt in your system. Place the seedling in the net pot and carefully fill the surrounding space with your chosen growing medium (like clay pebbles) to support it. Make sure the roots can reach down towards the water.
Watch: How to Build a Hydroponic System at Home
Step 7: Place Net Pots and Turn On the Pump
Put the lid back on the tote. Place your net pots with plants into the holes in the lid. Make sure the bottom of the net pot (or the roots/starter plug) is touching or very close to the nutrient solution. Plug in your air pump. You should see bubbles rising from the airstone. Success!
Step 8: Set Up Lighting
Position your grow light above the plants. The distance will depend on the type of light you have. Check the manufacturer’s recommendations. Most leafy greens need about 14-16 hours of light per day. You might need a timer to automate this, which is super convenient. Just set it and forget it.
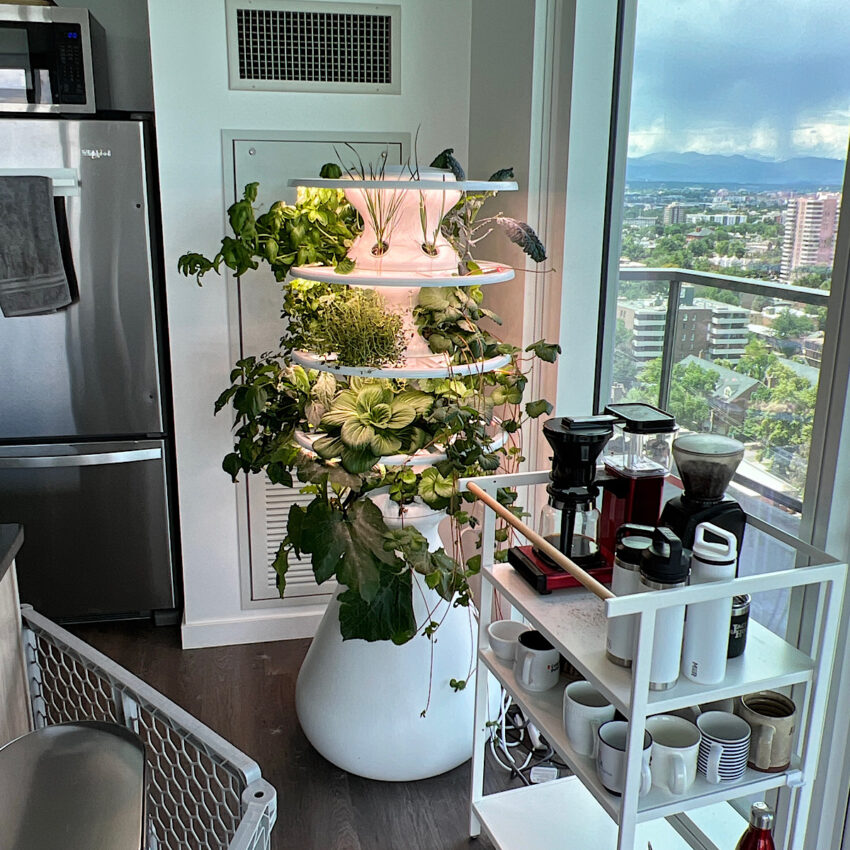
What Can You Grow? The Best Kitchen Hydroponic Candidates
Not everything thrives in a hydroponic system, especially a small kitchen one. Stick to plants that don’t need a ton of space or a huge root system.
- Leafy Greens: Lettuce (romaine, butterhead, loose leaf), spinach, kale, arugula, Swiss chard. These are the superstars of kitchen hydroponics. They grow fast and don’t need much fuss.
- Herbs: Basil, mint, parsley, cilantro, chives, oregano, thyme. Perfect for adding flavor to your cooking. Most herbs do exceptionally well.
- Smaller Fruiting Plants: Some varieties of dwarf tomatoes, peppers (like chili peppers), and strawberries can be grown, but they require more light, more nutrients, and often more support (trellising). They’re more advanced projects.
What NOT to Grow (Generally)
Root vegetables like carrots, potatoes, and beets are generally a no-go for begiers in kitchen hydroponics. They need deep soil to develop properly. Vining plants like large tomatoes or cucumbers can get too big and unwieldy for a small indoor setup without significant infrastructure. Stick to the greens and herbs first!
Maintenance: Keeping Your Kitchen Garden Thriving
Hydroponics isn’t zero work, but it’s way less than soil gardening. Here’s the routine:
- Check Water Level Daily: Top off with plain pH-adjusted water as needed. Plants drink the water, leaving nutrients behind, so topping off with plain water keeps the concentration from getting too high.
- Monitor pH and Nutrients: Test your pH daily or every other day. Adjust as needed. Check your nutrient concentration (EC/TDS) every few days.
- Change Nutrient Solution: Completely empty and refill your reservoir with fresh nutrient solution every 1-3 weeks, depending on your system size and plant growth. This prevents nutrient imbalances and buildup of unwanted salts.
- Keep it Clean: Clean your reservoir thoroughly during each nutrient change. Algae and bacteria can be a problem if you let things get grimy.
- Inspect Your Plants: Look for signs of pests or nutrient deficiencies. Catching problems early is key.
Troubleshooting Common Kitchen Hydroponic Issues
Even with the best intentions, you might run into snags. Here are a few common ones:
- Yellowing Leaves: Often a sign of nutrient deficiency or incorrect pH. Check your pH first, then your nutrient levels.
- Wilting: Could be lack of oxygen (check your air pump!), low water level, or root rot (too high temps, or not enough oxygen).
- Algae Growth: Your reservoir isn’t getting enough light blocked out. Use an opaque container and cover any exposed water surfaces.
- Slow Growth: Insufficient light, wrong nutrient mix, or incorrect pH are the usual suspects.
FAQ: Your Burning Hydroponic Questions Answered
What are three plants that are not recommended for hydroponics?
Honestly, stick with leafy greens and herbs to start. You’ll want to avoid root vegetables like carrots, potatoes, and radishes. They need space to grow underground, which a typical hydroponic setup just doesn’t provide. Also, large vining plants like full-sized cucumbers or sprawling squash plants can quickly outgrow a small kitchen system. They require a lot more support and space than you might think.
Source : farmtojar.com
Is tap water ok in hydroponics?
Often, yes, but it depends. Your tap water quality is key. Tap water usually has some minerals already, which can be helpful. However, it can also contain chlorine or chloramine, which can harm beneficial bacteria and your plants. It’s best to let tap water sit out for 24 hours to allow chlorine to dissipate, or use a filter. More importantly, you need to know your tap water’s starting EC/TDS level and its pH. If your tap water is already very high in dissolved solids or has a weird pH, you might need to use filtered or RO (reverse osmosis) water. Always test!
How much does a hydroponic system for a kitchen cost?
This really varies. You can DIY a super basic DWC system for under $100 if you’re resourceful. Buying a pre-made countertop unit? Those can range from $150 to $500 or even more, depending on size and features. The biggest ongoing costs are electricity for the lights and pumps, and the nutrient solutions themselves.
Do I need special lights for hydroponics?
Yes, usually. Unless you have an insane amount of direct sunlight hitting your kitchen spot all day, your standard overhead kitchen lights won’t cut it. You’ll need dedicated LED grow lights. They provide the specific spectrum of light plants need to photosynthesize efficiently. They’re an investment, but crucial for good growth indoors.
How often do I need to change the water in a hydroponic system?
For a small kitchen DWC system, you’ll typically want to do a full reservoir change every 1 to 3 weeks. You’ll top off the water level more frequently (daily or every other day) with plain, pH-adjusted water. A full change ensures you’re not getting nutrient imbalances or unwanted buildup. Think of it like giving your plants a fresh, balanced meal regularly.
Final Thoughts: Your Kitchen Awaits
Starting a hydroponic garden in your kitchen isn’t some impossible feat reserved for botanists. It’s accessible, rewarding, and honestly, pretty cool. You get the freshest possible produce right at your fingertips, year-round. You’ll save water, reduce your carbon footprint, and impress your friends with your indoor green thumb. Start simple with a DWC system, pick some easy-to-grow greens or herbs, and get growing. The future of your kitchen counter produce is here. Go get it!
Frequently Asked Questions
-
What are three plants that are not recommended for hydroponics?
Honestly, stick with leafy greens and herbs to start. You’ll want to avoid root vegetables like carrots, potatoes, and radishes. They need space to grow underground, which a typical hydroponic setup just doesn’t provide. Also, large vining plants like full-sized cucumbers or sprawling squash plants can quickly outgrow a small kitchen system. They require a lot more support and space than you might think.
-
Is tap water ok in hydroponics?
Often, yes, but it depends. Your tap water quality is key. Tap water usually has some minerals already, which can be helpful. However, it can also contain chlorine or chloramine, which can harm beneficial bacteria and your plants. It’s best to let tap water sit out for 24 hours to allow chlorine to dissipate, or use a filter. More importantly, you need to know your tap water’s starting EC/TDS level and its pH. If your tap water is already very high in dissolved solids or has a weird pH, you might need to use filtered or RO (reverse osmosis) water. Always test!
-
How much does a hydroponic system for a kitchen cost?
This really varies. You can DIY a super basic DWC system for under $100 if you’re resourceful. Buying a pre-made countertop unit? Those can range from $150 to $500 or even more, depending on size and features. The biggest ongoing costs are electricity for the lights and pumps, and the nutrient solutions themselves.
-
Do I need special lights for hydroponics?
Yes, usually. Unless you have an insane amount of direct sunlight hitting your kitchen spot all day, your standard overhead kitchen lights won’t cut it. You’ll need dedicated LED grow lights. They provide the specific spectrum of light plants need to photosynthesize efficiently. They’re an investment, but crucial for good growth indoors.
-
How often do I need to change the water in a hydroponic system?
For a small kitchen DWC system, you’ll typically want to do a full reservoir change every 1 to 3 weeks. You’ll top off the water level more frequently (daily or every other day) with plain, pH-adjusted water. A full change ensures you’re not getting nutrient imbalances or unwanted buildup. Think of it like giving your plants a fresh, balanced meal regularly.